
Composite Bonding.

Composite bonding is a quick and minimally invasive way to enhance your smile without removing healthy enamel. It is used to improve tooth shape, size and colour.
Problems composite can F I X
-
Composite bonding can help fix minor problems related to the shape of the tooth. Composite bonding can be used to repair chips, fractures and uneven surfaces. It can also create a more uniform, straighter appearance. Adding more symmetry to your smile.
-
Composite bonding can be added to the tooth surface without removing healthy enamel to build up smaller teeth. Composite can close gaps between smaller teeth and can restore teeth that have shortened or worn away due to premature tooth wear.
-
Composite can be layered over the front of the tooth as a veneer to improve the colour, masking the underlying darker natural tooth. This is useful when the natural tooth colour has blemishes, is damaged or you want a brighter colour than your natural shade. Bleached shade composite veneers offer a whiter tooth colour than naturally whitened teeth.
What is Composite Bonding?
Composite is a tooth coloured putty like material which is sculpted onto the natural tooth to improve its colour, shape and appearance. Composite bonding is a simple, quick and easy method of enhancing your smile without harm to the underlying tooth. Composite bonding is a single visit treatment and usually involves no drilling, no needles and no pain.
Composite Veneer Vs Edge Bonding
Composite can be bonded onto the entire tooth surface as a composite veneer or just added to the edges to correct minor imperfections.
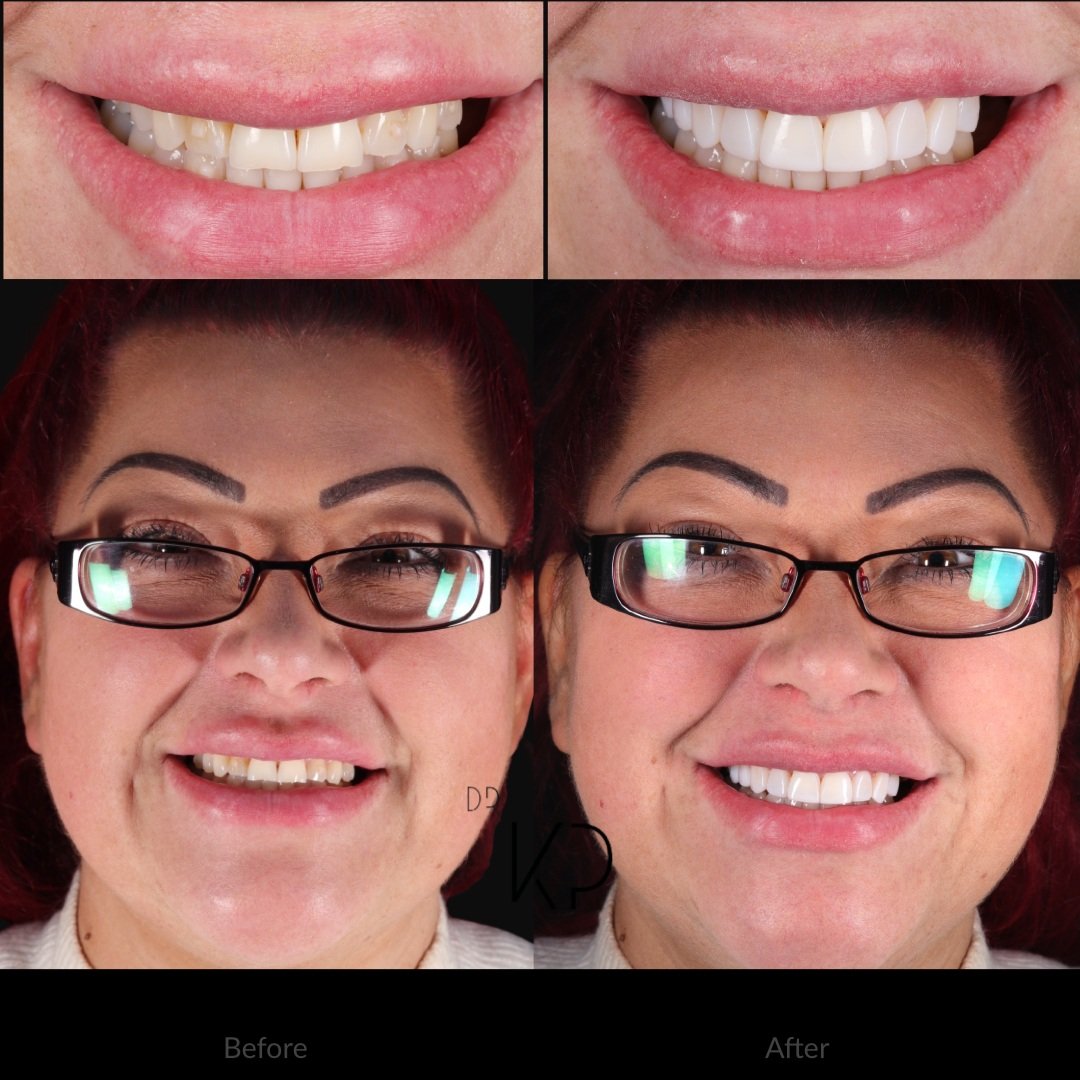
Smile Comparison | Donna
Donna suffered from shortened teeth due to teeth grinding. She had also wanted a bigger, brighter smile. We transformed her smile using ten composite veneers.
Who Can Have Composite Bonding?
-

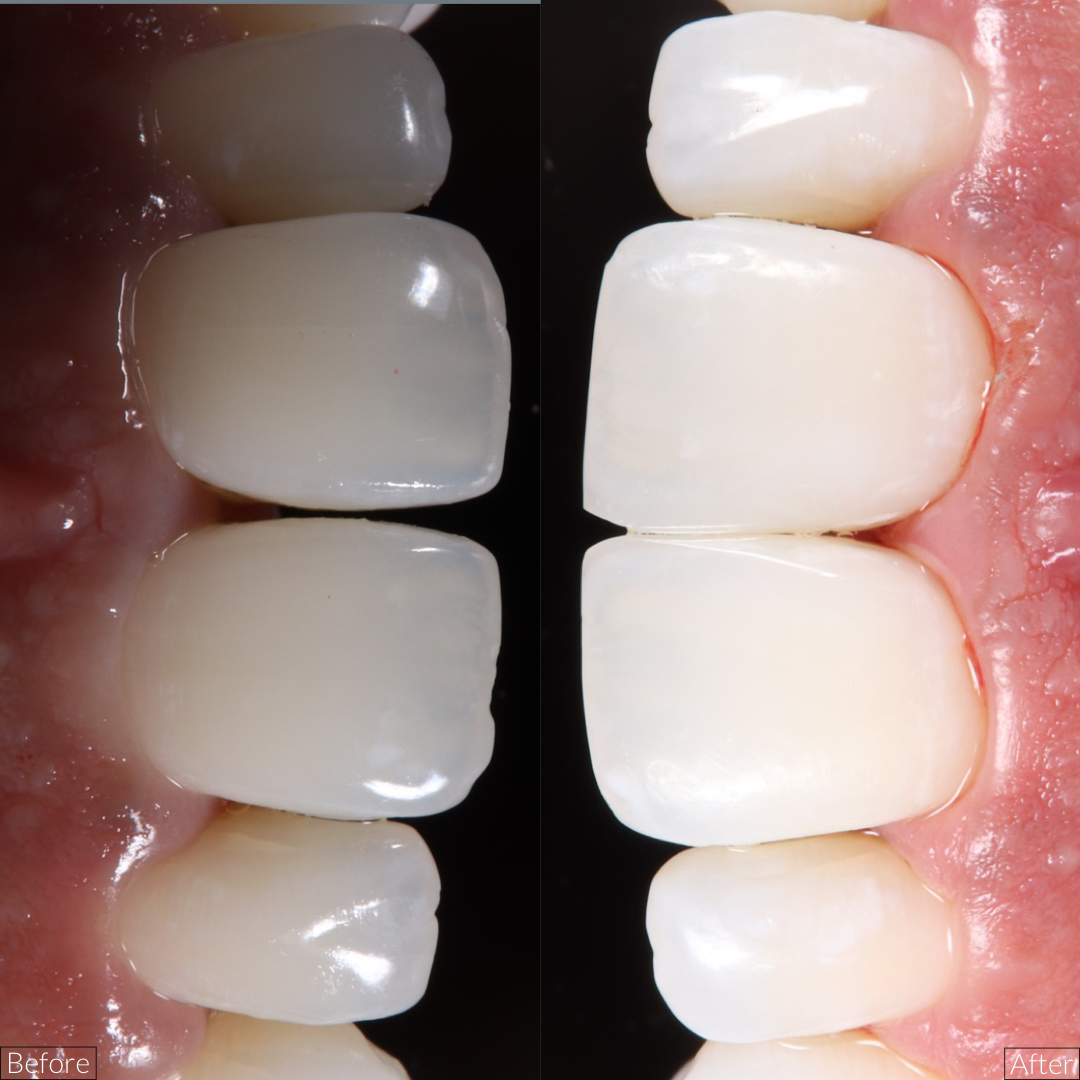
Spacing
Katie came to see me to fix the gaps between her teeth. She wanted a quick, simple and pain free solution. We decided on six composite veneers matched to her current tooth colour to close the spaces. We did this in a single visit.
-

Chipped Teeth
Mohammed had chipped his teeth due to the way his bite was positioned. We first improved the position of his bite with Invisalign (before image). We did a same day smile upgrade by repairing his upper six teeth with composite edge bonding.
-

Uneven Smile
Lauren had finished invisalign with her orthodontist. She was referred to me to perfect her smile. We removed the buttons and placed composite edge bonding on the front teeth keeping things super natural.
-
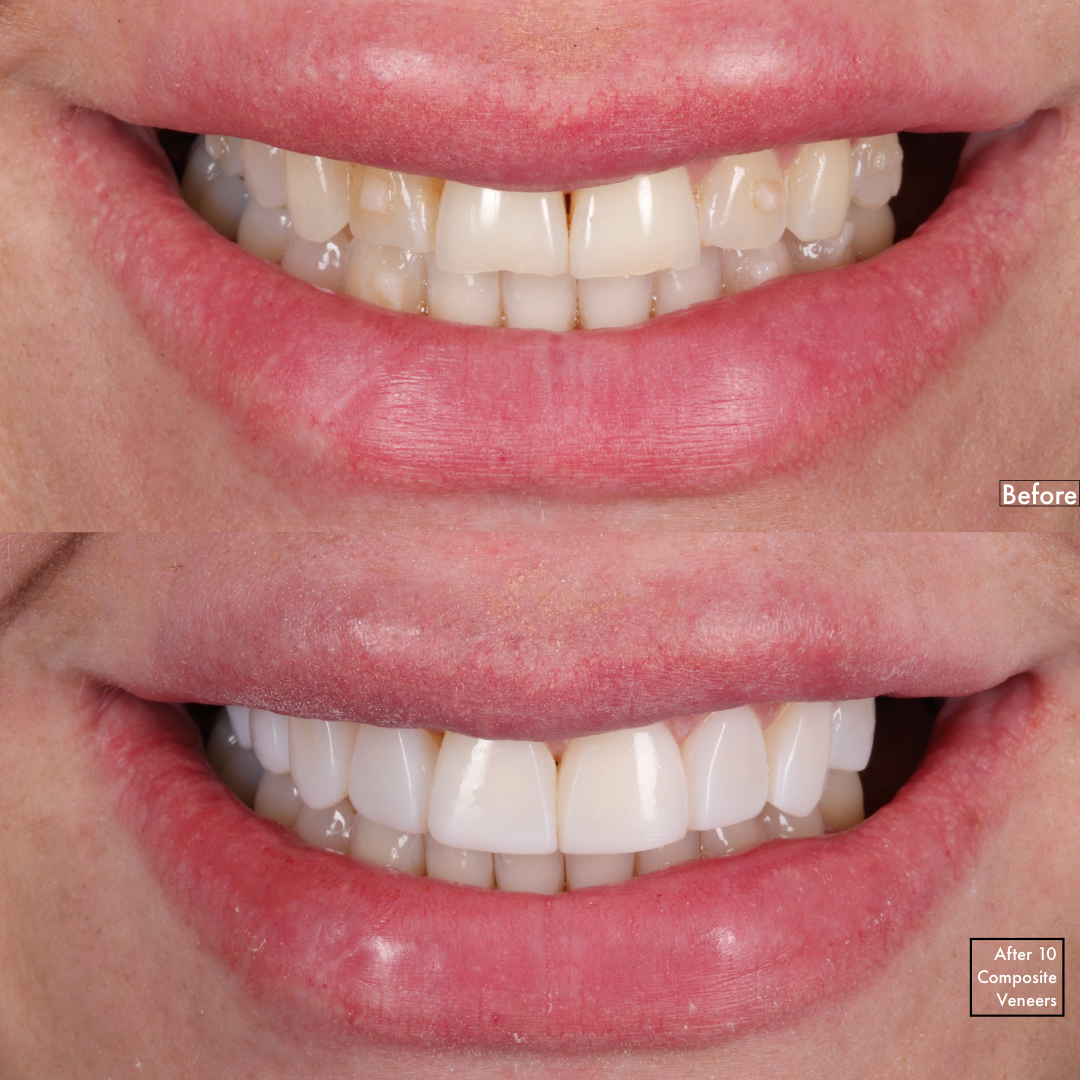
Tooth Wear
Donna had ground her teeth short from night time bruxism. She wanted to improve the colour of her smile and have teeth she could see when smiling. We restored the ten upper teeth using composite veneers to build back the normal tooth size and shape.
-

Misplaced Teeth
Fatima disliked the gaps and the mispositioned teeth, she wanted to have a straighter more symmetrical smile. Using composite veneers on just two teeth (the lateral incisors) we masked the mispositioned teeth and closed the gaps in a single visit.
-

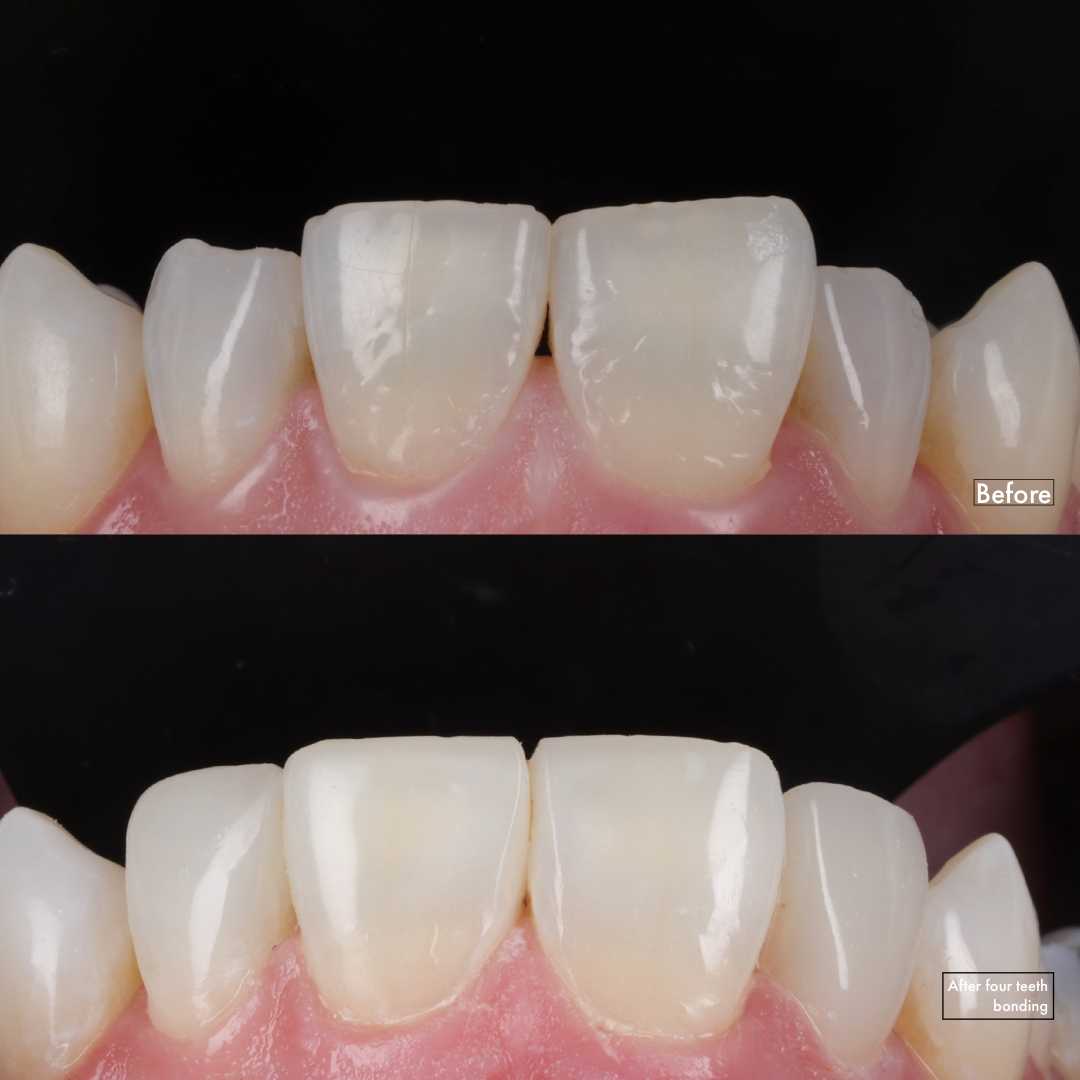
Uneven Edges
Shanice wanted to have even edges to her teeth, she hated that the teeth were bumpy and uneven. In a single visit we corrected this by composite edge bonding of the four upper front teeth.
Whats the process?
The treatment steps
Step 1. Consultation & Smile Assessment
-Every patient will have a full dental examination, gum health check, shade analysis and smile assessment. X-rays are done if indicated
Step 2. Treatment Plan & Consent
-If no repair work is required and the teeth and gums are healthy a plan will be made and the options, costs, times, risk and benefit will be explained
Step 3. Treatment Visit
Depending on whether your teeth require whitening or other treatment, composite bonding will be placed on your first treatment visit.
Step 4. Review
All of my patient receive a review to ensure the complete smile is perfect, small adjustments can be made at this visit.
Situations where composite bonding is suitable:
To repair chipped teeth
To fix cracks
To restore tooth wear
To prevent further tooth loss
To build up smaller teeth
To close gaps between teeth
To brighten tooth colour
The main benefits are:
No needles / Injections
No drilling of the natural tooth structure
Same day result
How is the treatment performed?
Watch Me LIVE Placing Composite Bonding.
Case 1: 6 Teeth Composite Bonding
Case 2: 6 Teeth Composite Bonding ( With Voiceover)
Case 3: 4 Teeth Composite Bonding
Step 1. The tooth surface is thoroughly cleaned using a sandblaster to remove debris.
Step 2. A Blue gel is used to roughen the surface microscopically this helps the bonding adhere to the tooth.
Step 3. The selected shade of composite is then applied to the tooth carefully using special instruments and brushes to sculpt to the desired shape, often in several layers.
Step 4. A Blue light is used to cure the material which then hardens.
Step 5. The procedure is completed by smoothing the tooth surface and polishing to attain a glossy finish.


Composite Bonding FAQs
-
Where the teeth are misaligned very slightly, composite bonding can be used to mask this however this is subject to a full clinical assessment. Ideally alignment of the teeth using invisalign or traditional braces is best before the teeth undergo composite bonding treatment.
-
Composite bonding is a lower cost, minimally invasive, treatment option which is ideal for correcting small changes in tooth shape, size and symmetry. Common reasons for treatment include fractures, small imperfections, minor gaps, chips and uneven edges.
Porcelain (ceramic) veneers are hand made by talented dental lab technicians and are glued onto the natural tooth structure to improve the overall appearance.
These ultra thin, contact lens like, veneers are shaped to fit onto the front surface of your teeth. They usually, but not always, require some smoothing and reduction of the natural tooth structure to create room for them to be glued onto the tooth. Porcelain is recommended when there are larger cosmetic defects such as deep discolouration, large changes to tooth shape and size, previously placed composite bonding which maybe looking tired. Porcelain tends to offer the most superior result due to its added longevity and unrivalled aesthetics. They are more costly than composite bonding and require additional visits.
-
There is no official recommendation, however a good starting point is assessing your smile in the mirror.
Begin by saying the letter ‘E’ this will help you see how many teeth you see on smiling. Usually to get the best aesthetic results most patients opt for 8-10 upper teeth. This creates a broader, uniform and more symmetrical smile.
-
Advances in Composite bonding, have meant that this treatment has good long term results. Typically the longevity depends on many factors including, your current bite, tooth grinding or bad dental habits, quality of the natural tooth and oral hygiene. Good results can be expected for 3 to 5 years. In this time composite may require refreshing. It is recommended that composite is annual professional polished.
-
In most cases no dental injections are needed, however in select cases where it would be advantageous to the long term outcome of the treatment an injection maybe needed. However in every case, I will discuss the options with you and work with you to achieve the best outcome.
-
Composite is often performed in a single visit. Usually your new smile take between 2 weeks to 3 months to ‘acclimatise’ to, so I always offer a complementary second visit for minor adjustments. Composite bonding appointments are typically 1-2 hours in length. The more teeth that are treated the more time I will spent on your teeth. I will never rush any treatment and so most appointments are booked for longer than needed.
-
There are several steps that I take to ensure that your smile is something you are proud to show off!
Firstly during your initial appointments you will receive a smile mockup. This is a preview of your final smile made by temporarily adding composite bonding to your teeth. This allows you to directly see your new smile and take a selfie to show your friends and family for an opinion. I always offer you time to reflect on this decision and therefore usually perform composite bonding at a subsequent treatment visit.
On the day of the treatment, I will reconfirm your new smile plan and ensure you are happy to proceed.
After the treatment is performed, I will show you the changes made in the mirror and together, if needed, adjustments can be made with you observing in the mirror. This way the changes can be guided by you, so that you are happy with the result.
Typically its take 2 weeks to 3 months to adjust to a new smile. As such I will always insist on a review appointment to allow adjustments following period of acclimatisation.
At this review, changes can be made as composite is purely additive and no healthy tooth is removed during the placement of the bonding.
If, despite these changes, you feel the bonding is not suited for you. Composite can be removed from the tooth surface.
-
Composite unlike natural tooth enamel is more porous, this means that it is more susceptible to dietary staining. Foods and drinks which have rich colouring such as red wines, teas, coffee and even smoking can lead to staining.
Preventing Staining
Drinking stains can be reduced by using a straw to avoid the contact of the fluid with the composite.
In addition the use of tooth whitening within bespoke trays can help alleviate the staining around composite.
Exceptional oral hygiene with the use of interdental floss, brushes and waterjets can reduce stain build up between teeth.
A professional hygienist will use high pressure jet to blast stains away that are hard to reach with at home care.
I perform an annual polish using buffing tools and polishing paste to enhance the shine and create a glossy finish.
-
Composite, unlike a natural tooth, has weaker physical properties. This means that the bonding must be looked after carefully and care must be taken to prevent breakage.
Minor composite chips and fracture are not uncommon and can be repaired easily.
I offer a 12 month guarantee for this treatment which means you will not incur any fees if repair is needed during this time.
-
Composite Bonding is a tooth coloured resin material which is gently applied and sculpted onto the natural tooth structure. A composite veneer is where the entire front surface of the tooth is layered with the composite material. This is usually done when there are larger imperfection, larger gaps or fractures. Edge bonding, if where just the edges of the teeth are sculpted with composite, this is to correct smaller imperfection such as small chips or after invisalign.